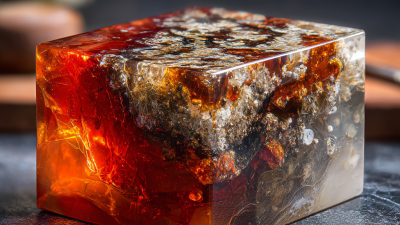
In recent years, the popularity of Clear Epoxy Resin in DIY projects has surged, and for good reason. According to market research conducted by Grand View Research, the global epoxy resin market is expected to reach USD 12.3 billion by 2025, growing at a CAGR of 6.2% from 2019 to 2025. This remarkable growth is attributed to the versatile applications of Clear Epoxy Resin in areas such as woodworking, arts and crafts, and home improvement. Its ability to create a sleek, glass-like finish while providing durability and resistance to heat and moisture has made it a favorite among DIY enthusiasts and professionals alike. As more creators seek to elevate their projects with stunning aesthetics and longevity, understanding how to effectively use Clear Epoxy Resin becomes crucial to achieving impressive results. This blog will explore various comparison techniques, tips, and tricks to harness the full potential of Clear Epoxy Resin in your DIY endeavors.
When embarking on DIY projects with clear epoxy resin, having the right tools and materials is essential for achieving stunning results. The first step in preparation is to gather high-quality epoxy resin and hardener, which are the foundational elements for your project. Additionally, consider including a variety of molds that suit your design needs, as well as pigments for those who wish to add a pop of color or achieve a marbled effect. Safety gear, including gloves and masks, is crucial to protect yourself from the fumes and resin splashes during the mixing and pouring processes.
To enhance your epoxy resin crafting experience, certain tools are invaluable. A heat gun can help eliminate bubbles that may form during the curing process, ensuring a smooth finish. For precise measurements, a digital scale is essential for mixing resin and hardener to exact specifications. Lastly, exploring local suppliers or reliable online sources can provide you with everything from resin molds to project kits, making it easier to kickstart your creative endeavors.
With the right preparation and resources, you will be well on your way to mastering clear epoxy resin techniques in your next DIY project.
When embarking on your DIY projects with clear epoxy resin, the workspace setup is crucial for achieving stunning results. Begin by selecting a well-ventilated area, as epoxy resin emits fumes that can be harmful if inhaled over time. Ensure that your workspace is clean and free of dust or debris that could compromise the finish of your project. Lay down a protective covering, such as a plastic tarp or drop cloth, to safeguard surfaces against spills and drips, making cleanup easier.
Next, organize all your materials and tools before you begin. Gather your epoxy resin, hardener, mixing tools, and any pigments or fillers you plan to use. Having everything within reach streamlines the process, allowing you to focus on the art rather than searching for supplies mid-project. Make sure to wear appropriate safety gear, including gloves and goggles, to prevent any skin contact or eye irritation. This preparation not only promotes safety but also enhances your efficiency and creativity as you dive into your epoxy resin project.
When embarking on DIY projects involving clear epoxy resin, mastering the mixing process is fundamental to achieving a flawless finish. According to a report by the American Composites Manufacturers Association, the proper mixing ratio of epoxy resin to hardener is critical, with most formulations recommending a 2:1 or 1:1 ratio depending on the specific product.
Deviating from this ratio can lead to incomplete curing, resulting in a cloudy appearance or sticky surface that detracts from the project's visual appeal.
To ensure a perfect epoxy blend, it is essential to mix thoroughly. Industry best practices suggest using a slow and steady stirring method to minimize air bubbles, which can compromise the clarity of the resin. A 2019 study published in the Journal of Composite Materials highlighted that air bubbles can reduce the mechanical strength of the cured epoxy, potentially leading to long-term failures in structural applications. Therefore, allowing the mixture to sit for several minutes post-mixing can help air bubbles rise to the surface and escape, resulting in a glass-like finish that showcases the beauty of your DIY project.
Epoxy resin is a versatile medium that can elevate your DIY projects from ordinary to extraordinary. By experimenting with creative techniques, you can create stunning effects that captivate and inspire. One popular method is the use of color pigments, which can be mixed directly into the resin or layered for depth. Consider using transparent or translucent pigments to achieve a beautiful, luminous effect that shifts with the light. Adding metallic additives can also lend a striking shine, transforming your piece into a shimmering centerpiece.
Another exciting approach involves the incorporation of natural elements, such as dried flowers, leaves, or even small stones. By embedding these materials in the epoxy, you can create a unique landscape that tells a story. For a more dramatic effect, try the "swirling" technique, where you layer different colored resins and use a stick or a brush to create intricate patterns. This method allows for endless possibilities as you blend hues to mimic the beauty of nature or achieve an abstract masterpiece. With these creative techniques, your epoxy resin projects can truly stand out with stunning results.
When working with clear epoxy resin, achieving the perfect finish is crucial for creating stunning results in your DIY projects. Polishing and curing are essential steps that can significantly enhance the overall appearance of your resin artwork. According to industry reports, a well-polished surface can increase the aesthetic value of resin pieces by up to 30%, making it a vital aspect of the crafting process. To achieve this, ensure that you use high-quality polishing compounds and dedicated tools. Start by sanding the surface with progressively finer grits before moving on to specialized polishers for a glass-like finish.
Curing your resin correctly also plays a pivotal role in the durability and vibrancy of your artwork. Optimal curing conditions can result in a more robust and clear end product. Studies indicate that properly cured resin can endure temperatures ranging from -50°F to 150°F, showcasing its resilience in various environments. For best results, consider investing in temperature-controlled curing racks and UV protectants. Additionally, sourcing reliable supplies such as resin molds and safety gear is critical in ensuring a successful outcome, as these elements contribute to both safety and quality in your resin projects. Prioritize using trusted suppliers to ensure that you are working with the best materials available in the market.
All of Hapco's formulations are completely free of Mercury.
Hapco has been in business for over 50 years!
*NOTICE* Hapco will be will be closed on Monday, May 26th, in observance of Memorial Day. |
Cookie | Duration | Description |
---|---|---|
cookielawinfo-checkbox-analytics | 11 months | This cookie is set by GDPR Cookie Consent plugin. The cookie is used to store the user consent for the cookies in the category "Analytics". |
cookielawinfo-checkbox-functional | 11 months | The cookie is set by GDPR cookie consent to record the user consent for the cookies in the category "Functional". |
cookielawinfo-checkbox-necessary | 11 months | This cookie is set by GDPR Cookie Consent plugin. The cookies is used to store the user consent for the cookies in the category "Necessary". |
cookielawinfo-checkbox-others | 11 months | This cookie is set by GDPR Cookie Consent plugin. The cookie is used to store the user consent for the cookies in the category "Other. |
cookielawinfo-checkbox-performance | 11 months | This cookie is set by GDPR Cookie Consent plugin. The cookie is used to store the user consent for the cookies in the category "Performance". |
viewed_cookie_policy | 11 months | The cookie is set by the GDPR Cookie Consent plugin and is used to store whether or not user has consented to the use of cookies. It does not store any personal data. |